Foot Calculator
- What you need
- Sticker Placement
- External Arch Left Seated
- Ankle Left Range of Motion
- Internal Arch Right Seated
- Internal Arch Left Seated
- External Arch Right Seated
- Ankle Right Range of Motion
- Pin Prick
- Heels / Ankles Kneeling
- External Arch Left Standing
- Internal Arch Right Standing
- External Arch Right Standing
- Internal Arch Left Standing
- Heels / Ankles Standing
- Lunge Right
- Lunge Left
What you need
This is what you need:
- A well lit open area with hardwood/tile floors
- 6 circle stickers (link to purchase here)
- A chair or stool
- Safety pin or paper clip
- A helper willing to take photos and videos of you and is able to get up and down from the floor
You will complete a set of photo captures. Feet without socks or pants covering your skin. We are trying to see your arch so please be sure to stand on a hard floor, no carpeting. Please make sure the background is not busy or the same color as your feet.
You’ll want to wear shorts, t-shirt and walking shoes (you’ll also do barefoot). Please tie hair back if it touches your shoulders.
You will need 6 green stickers. One on either side above the ankle bone and one on the back of your calf a little higher than the side stickers. You will stand like a flamingo - with each foot to be photographed, showing the internal and external arches each alone. Then you will stand with your feet straight ahead and slightly apart for a photo of your heels.

Sticker Placement
You will use stickers to attain automatic measurements. It is important that you put these on properly.
SMALL ROUND STICKERS
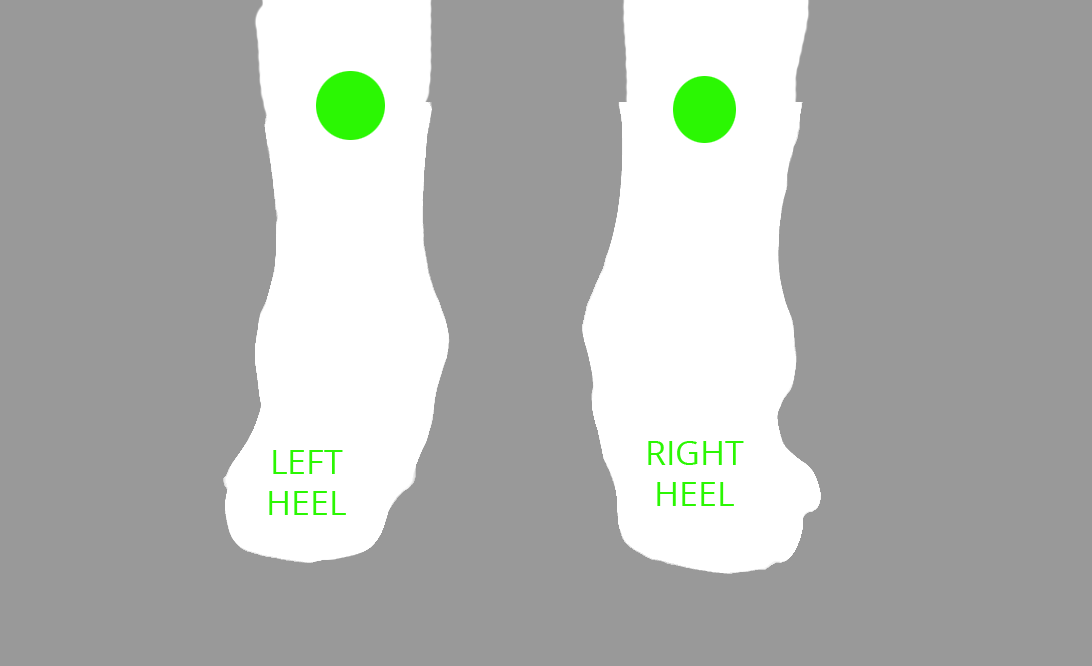
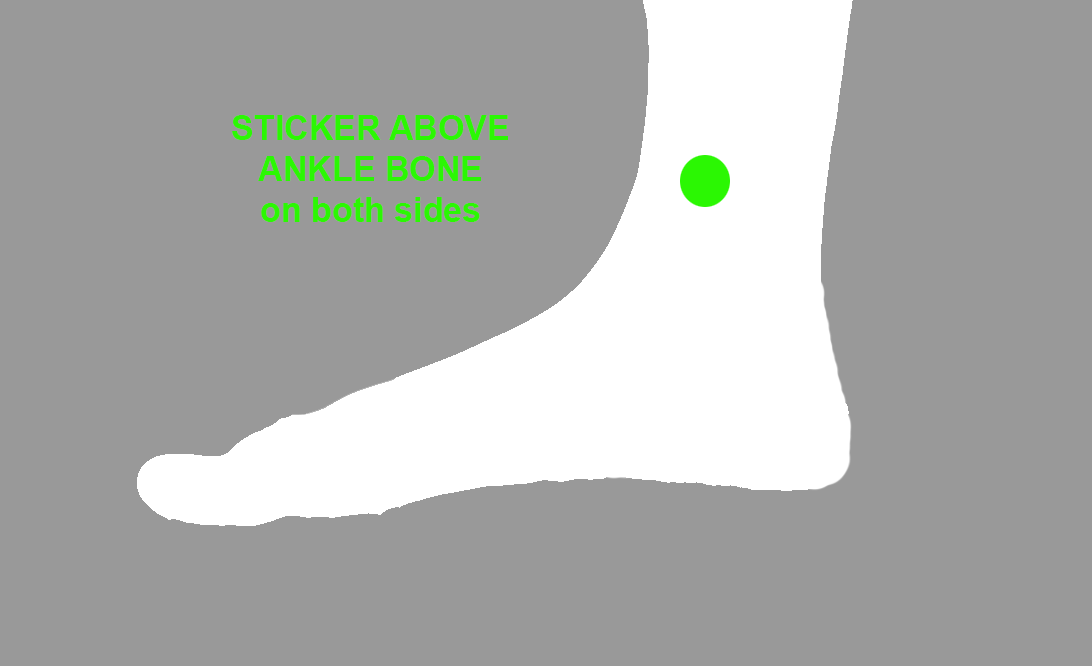
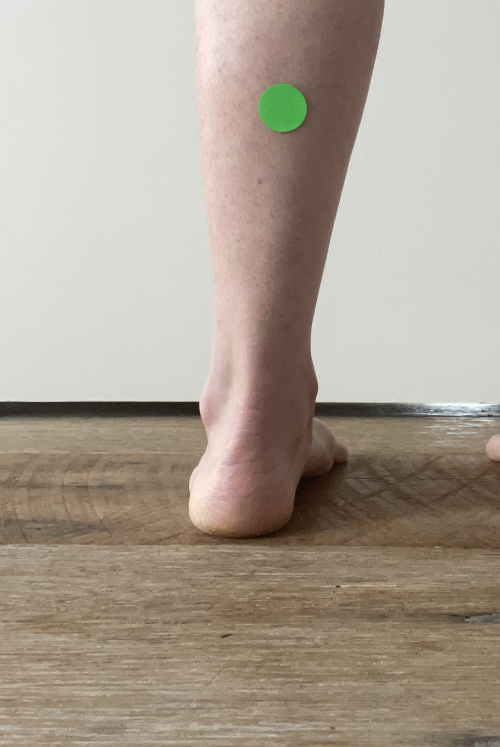
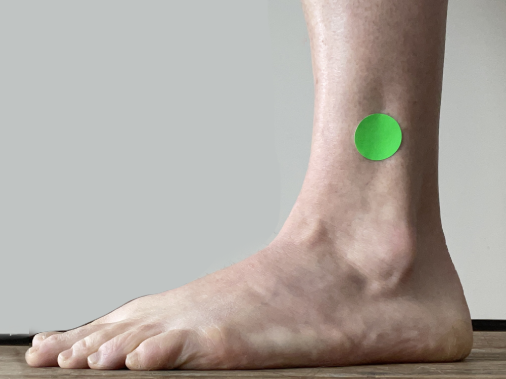
The small green stickers are for the foot calculator photos. You will put 6 stickers on total, 3 on each leg. One on either side of the leg and one on the back of the leg. Be sure to have all the stickers above the ankle.
External Arch Left Seated
CAMERA VIEW
CAMERA - SET UP:
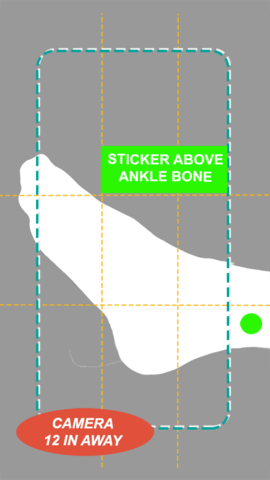
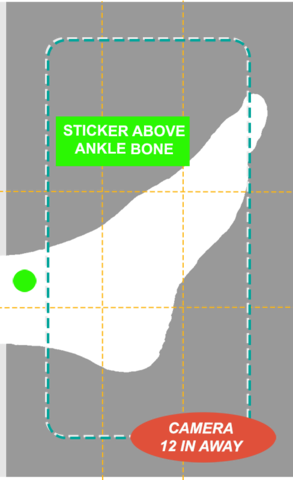
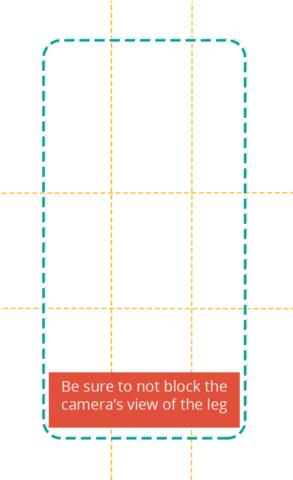
Camera 12 inches or more from the leg. Take a picture with a small space in front and behind the foot. Be sure to have clean background, good light and get the entire foot in view.
Participant:
Please sit and show the LEFT foot so that the outside arch can be photographed. Arch near your little toe.
Ankle Left Range of Motion
CAMERA VIEW
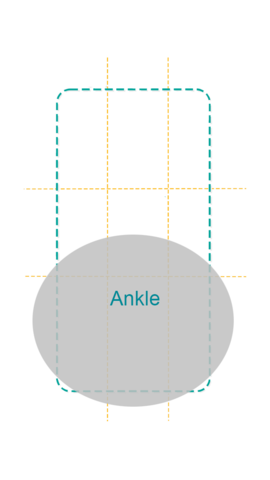
FRAME side view, Sitting in a chair.
Participant:
INSTRUCTIONS do each 3 times.
(1) lift your LEFT foot off of the floor;
(2) point your toes DOWN toward the floor;
(3) point your toes UP to the ceiling;
(4) point your SIDE -TO-SIDE;
(5) rotate toes in a CIRCLE moving ankle one direction then the other.
Move as much as possible in each direction.
Internal Arch Right Seated
CAMERA VIEW
CAMERA - SET UP:
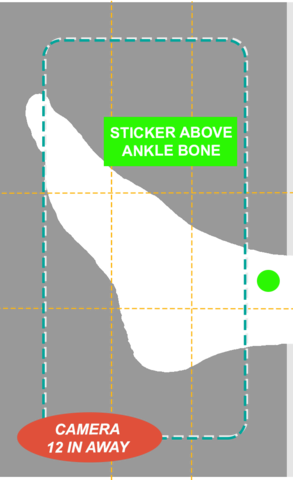
Camera 12 inches or more from the leg. Take a picture with a small space in front and behind the foot. Be sure to have clean background, good light and get the entire foot in view.
Participant:
Please sit and show the RIGHT foot so that the INSIDE arch can be photographed. Arch near your big toe.
Internal Arch Left Seated
CAMERA VIEW
CAMERA - SET UP:
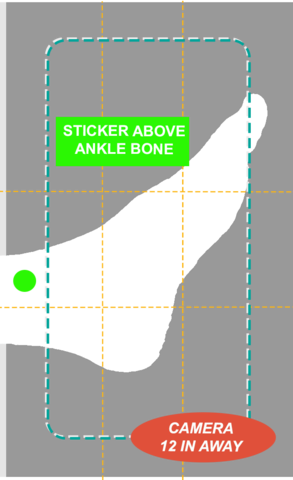
Camera 12 inches or more from the leg. Take a picture with a small space in front and behind the foot. Be sure to have clean background, good light and get the entire foot in view.
Participant:
Please sit and show the LEFT foot so that the INSIDE arch can be photographed. Arch near your big toe.
External Arch Right Seated
CAMERA VIEW
CAMERA - SET UP:
Camera 12 inches or more from the leg. Take a picture with a small space in front and behind the foot. Be sure to have clean background, good light and get the entire foot in view.
Participant:
Please sit and show the RIGHT foot so that the outside arch can be photographed. Arch near your little toe.
Ankle Right Range of Motion
CAMERA VIEW
FRAME side view, Sitting in a chair.
Participant:
(1) lift your RIGHT foot off of the floor;
(2) point your toes DOWN toward the floor;
(3) point your toes UP to the ceiling;
(4) point your SIDE -TO-SIDE;
(5) rotate toes in a CIRCLE moving ankle one direction then the other.
Move as much as possible in each direction.
Pin Prick
CAMERA VIEW
CAMERA - SET UP:
In tripod, make sure not to stand blocking the action.
Participant:
Exposing the skin on the dominant leg (kick a ball?) Using a safety pin you will test the sensation of the leg. Randomly pick the pin side / round side of the pin. At each point tap 3-5 times. Locations to tap, in order: mid thigh; below knee cap; mid shin; either side of ankle bone; inch down foot to big toe.
Heels / Ankles Kneeling
CAMERA VIEW
CAMERA-SET UP:
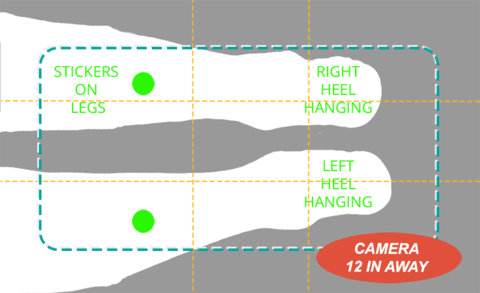
Camera 12 inches or more from the legs. Take a picture from above the two legs together. Be sure to have clean background, good light and get the entire foot in view.
Participant:
Please kneel or lay and show the back of your feet so that the legs and heels can be photographed.
External Arch Left Standing
CAMERA VIEW
CAMERA - SET UP:
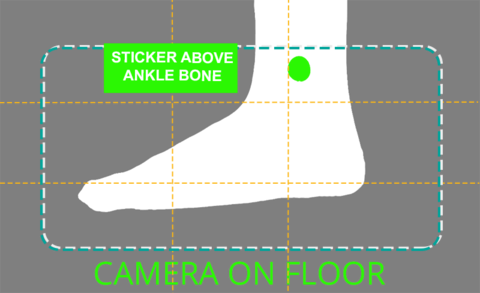
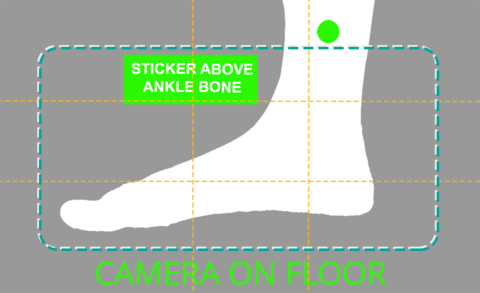
Put the phone on the floor WIDE with the lens of the camera at the top about 12 inches from the leg. Make sure you can see the sticker above the ankle bone. Place the foot with a small space in front and behind (stand about a foot out from the wall). Be sure to have clean background, good light and fill the frame with the foot as much as possible.
Participant:
please stand on one leg like you are a flamingo. Showing the outside of your LEFT foot to the camera. You can put your hands on a chair or wall.
Internal Arch Right Standing
CAMERA VIEW
CAMERA SET-UP:
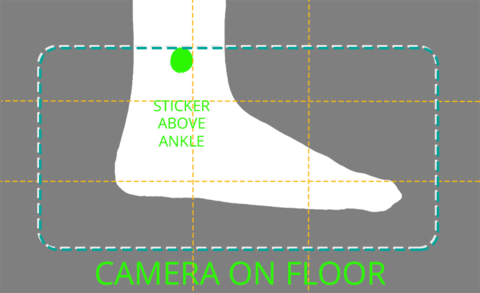
Put the phone on the floor WIDE with the lens of the camera at the top (camera furthest from the floor) at least 12 inches from the leg. Make sure you can see the sticker above the ankle bone. Stand i front of a wall for background. Be sure to have clean background, good light and fill the frame with the foot as much as possible
Participant:
About 1 foot from a wall: Please stand like a flamingo so that the inside of the Right foot can be photographed. You can support yourself for balance with your hands on a chair or wall.
External Arch Right Standing
CAMERA VIEW
CAMERA SET-UP:
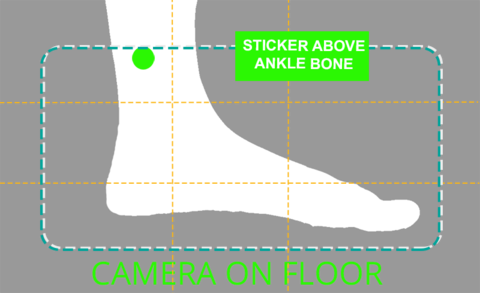
Put the phone on the floor (hardwood or tile, no carpet) WIDE with the lens of the camera at the top about 12 inches from the leg.. Make sure you can see the sticker above the ankle bone. Place the foot with a small space in front and behind (stand about a foot out from the wall). Be sure to have clean background, good light and fill the frame with the foot as much as possible
Participant:
Please stand like a flamingo so that the outside of the RIGHT foot can be photographed. You can put your hands on a chair or wall.
Internal Arch Left Standing
CAMERA VIEW
CAMERA SET-UP:
Put the phone on the floor WIDE with the lens of the camera at the top about 12 inches from the leg. Make sure you can see the sticker above the ankle bone. Place the foot with a small space in front and behind (stand about a foot out from the wall). Be sure to have clean background, good light and fill the frame with the foot as much as possible
Participant:
Please stand like a flamingo so that the inside of the Left foot can be photographed. You can support yourself for balance with your hands on a chair or wall.
Heels / Ankles Standing
CAMERA VIEW
CAMERA SET-UP:
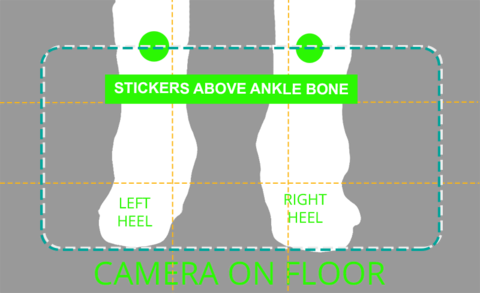
Phone on the ground to TALL ways with the lens of the camera at the top (camera furthest from the floor) minimum of 1 foot from the legs. Take a picture with a small space in front and behind the foot. Be sure to have clean background, good light and get the entire foot in view.
Participant:
Standing facing a wall with back to camera with heels fist distance apart. Please stand so that both heels can be photographed. You can put your hands on the wall.
Lunge Right
CAMERA VIEW
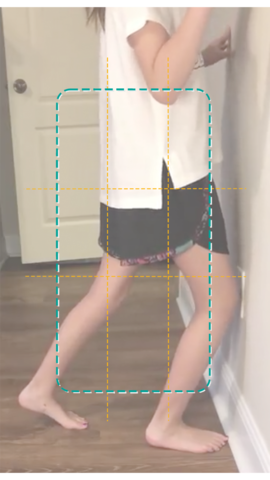
CAMERA SET-UP:
Tall camera and get the entire right leg in the camera. Take a picture of the right knee touching the wall while the right foot is flat on the floor.
Participant:
Face wall with the RIGHT second toe, center of the heel closer to the wall. LEFT leg behind the right foot in a tandem stance with hands on the wall. Perform a lunge in which the right knee is flexed with the goal of making contact between the knee and the wall while keeping the right heel firmly planted on the floor.
Lunge Left
CAMERA VIEW
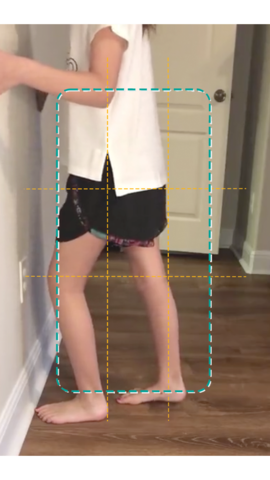
CAMERA SET-UP:
Tall camera and get the entire left leg in the camera. Take a picture of the right knee touching the wall while the right foot is flat on the floor.
Participant:
Face wall with the LEFT second toe, center of the heel closer to the wall. RIGHT leg behind the left foot in a tandem stance with hands on the wall. Perform a lunge in which the left knee is flexed with the goal of making contact between the knee and the wall while keeping the left heel firmly planted on the floor.